Author: Veronica

  • Oven-roasted asparagus with garlic

    Oven-roasted asparagus with garlic

    Oven-roasted asparagus | seefoodplay.com

    Hello, my name is Veronica, and I’m addicted to asparagus. Seriously, we eat the stuff several times a week and just can’t get enough of it! It used to be my “weekly splurge” when we lived in Paris because it was oh so expensive there, but I buy it like it’s going out of style now that we live in London and I can get enough for two at around £2!  Google tells me that it’s often thought of as a “luxury vegetable” – I didn’t even know such a thing exists…! I totally understand why, though, because whenever I make them I feel like I’m feasting on some precious food treasure that I don’t want anyone too many people to know about, lest there be an international shortage of these delightfully green weird-looking things. Asparagus is one of those foods that can be really amazing, or horribly offensively disgusting. Can you tell that I feel strongly about this vegetable?

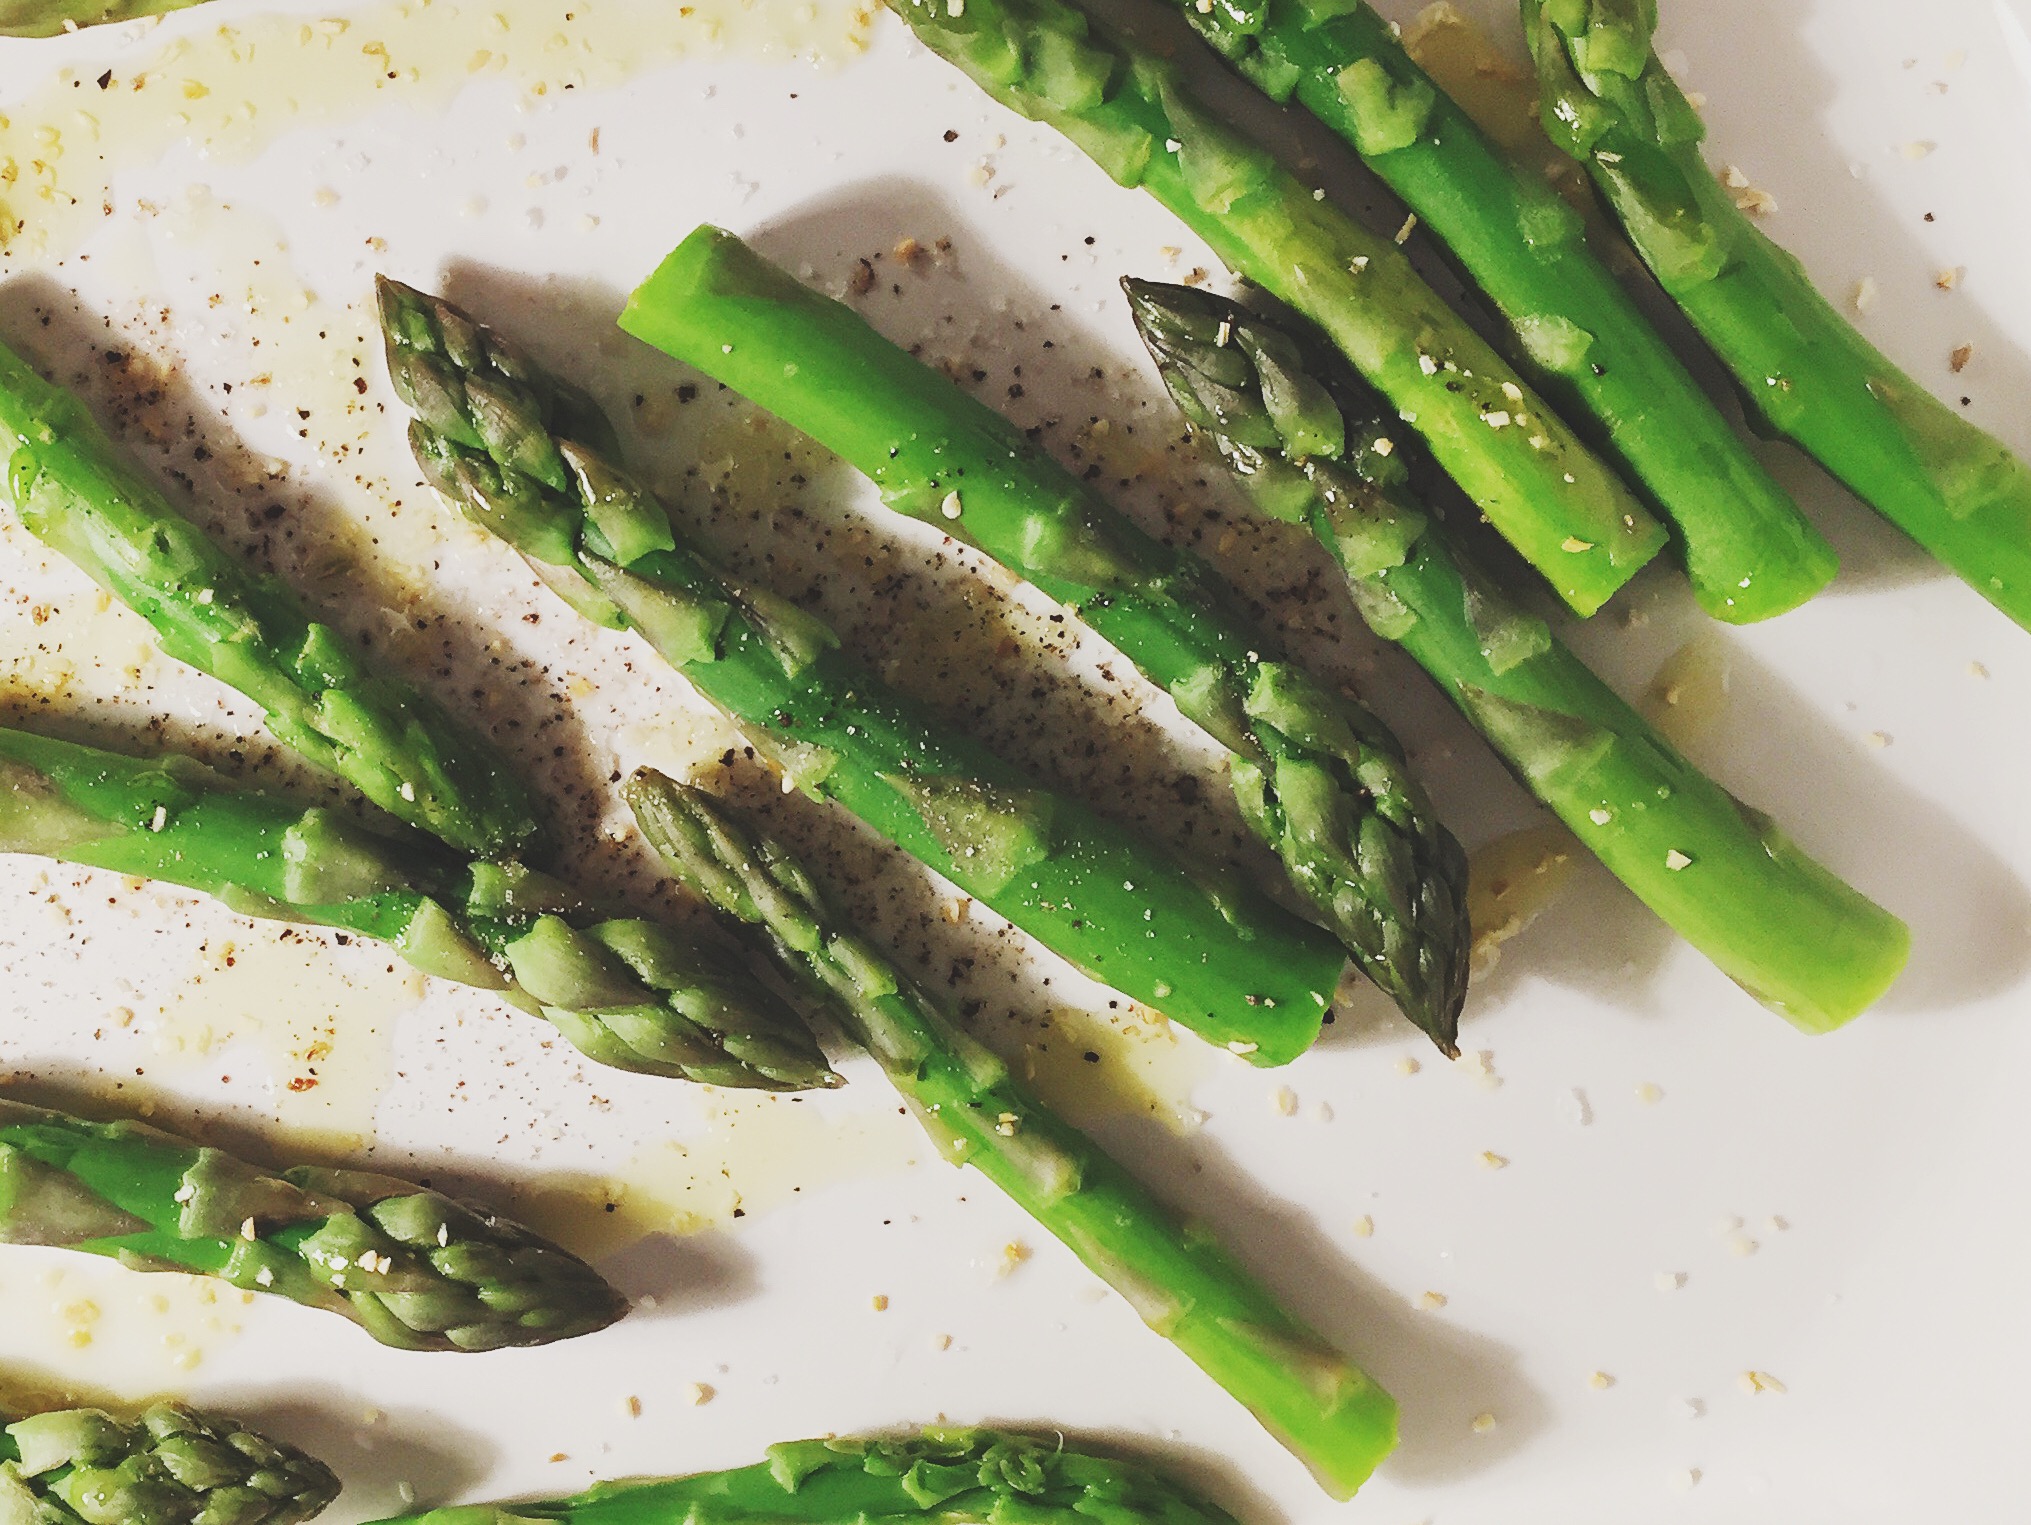
    Lots of people do know about asparagus and how amazing it is, though, and everyone has their own way of preparing it. I’m just going to put this out there: there’s a right way and a wrong way. I try not to be too “my way or the highway” when it comes to cooking, but some things are just oh so wrong.** Boiling is the wrong way, and grilling/roasting is the right way.

    My husband Jonathan wasn’t really a big veggie fan when we first started dating and this was a serious cause for concern for me: about 99% of my favorite recipes have either tomatoes or mushrooms in them (this is only a slight exaggeration) and these are two things that he used to despise. 

    Most of my veggies are prepared in the oven, though (or grilled) and this made all the difference! Whenever I ask which veggies he wants for dinner these days, his answer is almost always: broccoli, asparagus or corn! Yes, miracles do happen. He tolerates mushrooms now but still won’t go near a tomato (except for when I got him to eat green tomatoes once, after convincing him they were cucumbers. I know..terrible wife, but it worked and he liked them!).

    Anway, on to the good stuff: how to make perfect asparagus the right way.

     Oven-roasted asparagus | seefoodplay.com

    Ingredients: 

    • 150 grams of Asparagus
    • 1/2 teaspoon of salt
    • 1/2 teaspoon of fresh ground pepper
    • 1/2 teaspoon of garlic powder
    • 1 tablespoon of Good Olive Oil*

    Instructions:

    1. Bring a pot of water to boil, and preheat your oven to the maximum temperature or broil feature.
    2. While waiting for the water to boil, use a vegetable peeler or sharp paring knife to peel about 1 inch of the bottoms of your asparagus.
    3. Once the water is boiling, throw in your asparagus for 15 seconds. Yes, 15. Not 30 and certainly not longer. The blanching process will essentially only cook the very outer layer, and will leave the inside nice and crispy.
    4. Strain your asparagus well, and transfer to a baking dish large enough so that the asparagus stalks aren’t touching.
    5. Sprinkle them with salt, pepper and garlic powder and drizzle on the olive oil.
    6. Roast for 10 minutes, then serve immediately.

    They will come out crispy on the tips and softer but not mushy on the stalks. Otherwise known as perfect oven-roasted asparagus with garlic. Enjoy 🙂

    *you can taste the quality of your olive oil in this recipe, so now’s the time if there ever was one to use your good stuff.

    **Funny story… as I was writing this post, I thought “hmm I wonder if there are actually people out there saying that one should in fact boil asparagus? And if so, who are these crazies?” The number one recipe that came up massively surprised me, and even caused me a moment of self-doubt. Have I been getting it wrong all this time?? Nahhh – I stand by my belief that asparagus should never be anything-but parboiled. Can you guess where the first recipe for boiled asparagus is from, though? Google it for yourself and see if you’re as surprised as I was… 😉

  • Vegan spinach and basil pesto

    Vegan spinach and basil pesto

    Vegan spinach basil pesto | seefoodplay.com

    When Jonathan and I first started dating, he would often cook for me (that definitely didn’t last too long lol). His Man Menu was usually some sort of meat or fish (fried/grilled in a pan) with a canned vegetable or rice. If he was feeling fancy, though, he would make me a special treat: Pasta Pesto (announced in an Italian accent as he arrived with a piping plate to the table). The recipe was simple enough, and honestly not bad: once your spaghetti noodles were cooked to an al dente perfection, drain, then stir in your jarred pesto sauce and about ½ cup of cream. Mix well and serve to your lovely girlfriend.

    Bless his heart… he meant well and that’s one of the (many) reasons I fell for him, but I never really liked pesto, and pasta sauce out of a jar is basically a sin in my book. After all, why go for all the preservatives when you can make the same thing from scratch with only a few ingredients?!

    Jonathan loves pesto though, and religiously orders it whenever we are in Italy (because we go every year!! I will never stop being amazed by the fact that we get to spend a few weeks in Italy each summer. Even after 10 years of living in Europe, I gotta admit: some things never get old.)

    I have never been a big fan of pesto and I will always opt for a tomato-based sauce for my pasta when given the choice. Whenever I try to change it up, I’m disappointed and wish I had just ordered the spaghetti al pomodoro, pasta alla norma, or the Bolognese that I know I will love. Some non-tomatoey recipes, though, have a special place in my heart, and this pesto is one of them.

    I’ve been trying to really seriously plan our meals to make sure that we’re eating well-balanced and diverse meals, and I realized that almost all of my go-to recipes have meat (and dairy) in them. So, in the spirit of incorporating Meatless Mondays into our routine, I decided to try my hand at one of Jonathan’s favorites! And thus, the vegan spinach and basil pasta recipe was born. You didn’t think I would waste this opportunity to sneak in some veggies, did you? 😉

    To be fair, I didn’t plan to make this pesto vegan, but we didn’t have any parmesan on-hand, so I just skipped it and hoped for the best. The result is so surprisingly creamy and full of flavor that I can honestly say I didn’t miss the cheese (or tons of olive oil) one bit. The addition of spinach adds an extra dose of vitamins, and the basil gives it that pestoey zing and freshens it up.

    This vegan pesto recipe is legit you guys, so much so that I’m wondering if I’ll ever go back to making “regular” pesto. Traditional pesto is usually made with a ton of parmesan cheese and olive oil, and to be fair, is pretty darn good too. This stuff, though, is full of flavor with just enough garlic and just a splash of olive oil. So you can have a totally guilt-free bowl of pesto and (whole grain) pasta without thinking too hard about all of the calories. Enjoy!

    Vegan spinach basil pesto | seefoodplay.comVegan spinach basil pesto | seefoodplay.comVegan spinach basil pesto | seefoodplay.comVegan spinach basil pesto | seefoodplay.com

    Ingredients:

    • 1 cup of spinach
    • 1 cup of basil
    • 2 cloves of garlic
    • ½ cup of pine nuts
    • 2 tablespoons olive oil
    • 1 tablespoon salt
    • 1 teaspoon pepper
    • around ¼ cup of water

    Instructions:

    1. Combine all ingredients in the food processor, except for the water.
    2. Slowly add in the water until reaching the desired consistency.
    3. Serve over cooked linguine or penne (or whatever you prefer — those are just two of our favorites)

    Note: If it’s too thick, then add a tablespoon or two of water, until you get the desired consistency.

  • Eggplant parmesan rolls

    Eggplant parmesan rolls

    Easy vegetarian eggplant rolls | seefoodplay.comSpring is finally (kind of, sometimes) here, and all I can think of making are veggie-filled recipes that are light and fresh. This is one of those recipes that I really hesitate before making, because Jonathan doesn’t eat 95% of the ingredients (ie, eggplant and tomatoes). Being the lovely and supportive husband that he is, however, he always at least tastes my tomato-mushroom-eggplant-random other vegetable he’s never heard of recipes and sometimes he even likes them! (remember those Stuffed portobello mushrooms?). This one definitely falls into the category of recipes that Jonathan didn’t think he would like, but did. Add one point to Team Vegetable.

    I’m not even a big fan of eggplant myself, but I luuuvvvv eggplant parmesan and this: aubergine millefeuille (or my take on it: eggplant parmesan rolls). It can be served as a starter or main dish, is vegetarian-friendly, and only takes a few minutes to prepare.

    Sometime last year on one of me & Jonathan’s “date nights” we went to La Bouteille d’Or, a fabulous little Parisian restaurant with views on Notre Dame. When we got there I remember thinking that I’d fallen into a tourist trap because I was surrounded by groups of…well… tourists. The lighting was a bit too bright for my tastes and the atmosphere wasn’t really that cosy chic that I was hoping for. As soon as our waiter arrived at our table, however, we knew we were in for a treat: he was super professional and attentive, making sure everything was perfect during our meal. When we looked at the menu, we had our second pleasant surprise: the prices were great (especially for the neighborhood!! Hello there, view of Notre Dame), and there was a fixed price menu for even better deals. All of our food was good, but my entrée was really the star of the show: mille-feuilles d’aubergine. I remember forcing Jonathan to taste it and even he said it was good! The recipe is very simple (like a lot of French cuisine) and comes out extremely flavorful with just a few basic ingredients. It’s kind of the French version of eggplant parmesan and it is sooo good. Tomatoes, garlic, olive oil, mozzarella, eggplant… yes, please!

    Easy vegetarian eggplant rolls | seefoodplay.comEasy vegetarian eggplant rolls | seefoodplay.comEasy vegetarian eggplant rolls | seefoodplay.comEasy vegetarian eggplant rolls | seefoodplay.com

    Ingredients:

    • ½ eggplant*
    • 1 cup of shredded mozzarella
    • 4 tablespoons olive oil
    • 1 tablespoon garlic powder
    • Bread crumbs**
    • Marinara sauce***
    • 10 cherry tomatoes (halved)
    • 1/4 cup spinach, chopped
    • 1/4 cup fresh basil, chopped
    • 1/4 cup fresh grated parmesan
    • Extra olive oil (to drizzle on top)
    • Fresh basil (for garnish)

    Instructions:

    1. Preheat your oven to 350degrees F // 180 degrees C.
    2. Spread about 2 tablespoons of marinara sauce in a small baking dish, set aside.
    3. In a small bowl, mix together the garlic powder and olive oil.
    4. You eggplant should be cut in half vertically, in 1/4 inch thick slices (using a mandoline if possible).
    5. Layer on the following for your eggplant rolls:
      • A spoonful of marinara sauce
      • A spoonful of chopped spinach & basil
      • A spoonful of mozzarella
      • A spoonful of breadcrumbs
    6. Carefully roll up the eggplant slices, and place them crease-down into the baking dish.
    7. Drizzle a bit of the olive oil & garlic powder mixture over each one, then season with salt and pepper.
    8. Sprinkle the parmesan cheese and some extra mozzarella on top, then add a halved cherry tomato to each roll.
    9. Bake for about 15-20 minutes, or until the cheese is nice and golden.
    10. Garnish with more fresh basil, and serve immediately.

    *What to do with the rest of that eggplant, you ask? Well, you could double the recipe and make some extras for your lunch or freeze them. Orrrr… you could make Roasted eggplant caviar
    (I’ll be adding the recipe for that, soon! Picture the easiest and most flavorful (vegetarian) eggplant dip…ever!).

    **I don’t use pre-packaged breadcumbs, but they’re of course fine. If you want to go the fully homemade route, then try this: Place 1 cup of corn flakes, 1 tablespoon garlic powder, 1 tablespoon dried oregano, 1 tablespoon dried basil, and a tiny pinch of hot cayenne pepper, then grind in a food processor until about the size of breadcrumbs.

    ***If using my marinara sauce, no need to cook the sauce: simply combine all of the ingredients and then spoon the cause onto the eggplant slices. You might want to run the sauce through the food processor first to get it nice and smooth.

    This makes two servings as a starter, but can be doubled to make a main dish.

    If you don’t usually like eggplant then I suggest giving this recipe a try – it might just convert you!


  • A taste of London: Brick Lane

    A taste of London: Brick Lane

    A taste of London: Brick Lane (Dark Sugars chocolate shop) | seefoodplay.comThank goodness for Jonathan, otherwise I’d probably spend way too much all of my time indoors working on my various projects. When I’m not at work, these past few months I’ve either been in the kitchen cooking up new recipes or researching/working on a new DIY idea that I’ve been dreaming of all week, but didn’t have time for. Basically, I’ve been a homebody since we moved to London. In Paris, we had our little hangouts or neighborhoods that we’d go to for drinks, we had football games to go to, friends to meet-up with. Everything is new to us, here, though, so we are still working out our new hangouts and favorite ‘hoods.

    Besides, we have been living in London for the past few months, but haven’t really been taking advantage of our new city because A) we’ve been busy moving and B) the weather hasn’t exactly been cooperating (read: it has been downright cold almost every day since we’ve moved…!).

    This weekend, though, there was no excuse because I didn’t have any projects planned and the weather was awesome! I was in a bit of a funk and kind of just hanging out in PJ’s with no energy or motivation to do much, when J pulled out our London guide book and said “we are getting out of the house!”

    And he was so right to insist because we had a very London Saturday afternoon: strolling around Brick lane, stopping into a cute little chocolate shop, then having drinks before watching the Champion’s League game. I was so inspired by all of the vibrant sights and smells, that as soon as I got home I went back into Kitchen Experiment mode and cooked up a fabulous no bake, no yeast skillet pizza (which I’ll be posting soon)! Sometimes, getting out and doing something different or even so simple as just walking around a new neighborhood can lead to so much inspiration!

    So, in honor of Jonathan’s love of chocolate (seriously, that man loves his chocolate) today’s photos are from our stop into the Dark Sugars chocolate shop (address below). Bonus: they have lots of vegan options!

    Enjoy trying not to lick the screen 😉

    A taste of London: Brick Lane (Dark Sugars chocolate shop) | seefoodplay.com
    A taste of London: Brick Lane (Dark Sugars chocolate shop) | seefoodplay.com

    Dark Sugars

    141 Brick Lane, London E1 6SB, United Kingdom

    +44 7838 154319

  • Easy DIY Candles

    Easy DIY Candles

    DIY Candles | seefoodplay.com
    Annie Gozard Photography

    I don’t know about you guys, but I have a bad habit of under-estimating tasks that I take on. Organizing my wedding was one big fat example of that…times 100! For some reason, I got it in my head that I wanted to DIY everything that I could because I wanted things to be unique. The only way to make sure no one else was going to have the exact same decorations, or invitations…? To make them myself, of course! So, I made a big to-do list and got to work. We had 130 guests (of those, nearly 30 kids!) so just imagine the number of invitations, thank you cards, center pieces, and wedding favors we needed. All DIY’ed, of course.

    The wedding guest gifts were one of the most challenging things to choose, because I wanted something personalized but that wouldn’t break the bank. There’s some cool stuff out there, but if you have more than 100 guests like us, it can get quite pricey. I looked into ordering monogrammed favors online, but everything we found that was actually in our budget looked pretty cheap. Then, I ran across a tutorial on Pinterest for homemade candles and I had my Eureka! moment. Miniature DIY candles it would be, personalized with special labels and ribbons and stickers and stamps and scents… you get the idea. My 10-year old self was revived, and I pretty much immediately raced to the craft store to get my supplies. I set aside a Saturday afternoon to knock out the “candle project” and planned to tick this off my list just as quickly as the idea came to me.

    Reality soon set in, though, and this one was definitely a much bigger project than I anticipated. Partly, just because making 100 candles takes some time time if you’ve never actually made candles before, but also because I didn’t properly estimate supply quantities, and I had a mishap which caused me to junk a whole batch of about 30 candles. I’ll explain what went wrong, and hopefully how to help you avoid making my mistakes! I really enjoyed DIY’ing so much of our wedding and writing this tutorial brought back all those pre-wedding feelings ❤️. If you decide to take on a project like this one, I’d love to see photos! Did you DIY any of your wedding favors? I would love to see photos of those, too!

    If you’re making one candle, then this tutorial will be an absolute breeze and will take you around 15 minutes all together (plus drying time). Candle making is super fun, and how cool is it to give them out as little gifts, or to have your very own homemade candles around your house!?

    Let’s get started! (Please read through all of the notes at the bottom for helpful tips)

    Materials:

    • Containers for your candles
    • Candle wax
    • Candle wicks
    • Strong fast-drying glue or glue gun (to hold the wick in place)
    • Candle perfumes/scented oils
    • Decorations

    DIY Candles | seefoodplay.com

    DIY Candles | seefoodplay.com

    DIY Candles | seefoodplay.com

    DIY Candles | seefoodplay.com
    Annie Gozard Photography

    Instructions:

    1. Prepare your work area – even if you’re careful, you will get wax on stuff. Avoid an area with carpet! I used our dining room table, covered in my “craft cloth” and a bit of newspaper.
    2.  Next, set out all of your supplies (ie, wicks, glue, candle containers). Glue your wicks in the center of your candle containers. Mine are narrow so we had to be careful to get them properly centered. This is important because if they’re off-center, the wick will look crazy (in a bad way) once the wax is in! Depending on your containers and the length of your wicks, you might need to cut them down a bit.
    3.  Allow the glue to set as needed (over-night if you want to be sure), then start melting your wax.
    4.  To melt the wax, pour your granules into a pot over a low heat. I used disposable chopsticks to stir the wax and break up chunks to help the melting process. Important: hot wax is just that… HOT! Be careful and wear a long-sleeved shirt and pot holder when handling the wax.
    5.  Once melted, add in your desired scented oil and give the mixture a little stir — I used vanilla scented oil for this project.
    6.  Next, pour your wax into each container leaving about 1 inch of wick visible.
    7.  Your candles will start to set quickly, so now’s the time to make sure your wicks are centered in the wax. Once they’re about half set, gently move the wicks to the center of your candle. This might mess up the wax a bit but that’s ok – you’ll add another layer of wax to cover that up!
    8.  Once your candles have mostly set (about an hour or two), a dip or indentation will have formed around the wick. To get rid of that, simply pour in enough wax to cover it up and let them completely set, this time overnight.
    9.  Now, you can decorate  your candles however you want! You can leave them as they are because even as plain simple candles, they’re adorable. Or you can add twine, ribbons, tags or stickers to the candle container to jazz them up a bit!

    To decorate these candles, I used:

    • Twine
    • Ribbon
    • Card stock paper for the tags
    • Stamps & black ink stamp pads

    Notes:

    I ordered the wax to make my candles online. I got lucky with the first batch because it was a beautiful creamy off-white/ivory color. Because I didn’t order enough of the stuff the first time around, I had to buy more: it looked the same (same stuff, different brand) but oh was it different! Instead of that beautiful creamy white, it was a cheap-looking semi-transparent horribly-textured version of the good stuff that I ordered the first time. Unfortunately, I didn’t realize the difference right away because the wax takes on a different color when it’s melted vs solid. Oh the regrets…!

    Tip: Quantity – If you’re making a lot of candles, buy a small sample if possible and make sure that the color matches what you’re after. Then, make sure there’s enough stock of that brand to get you through your entire project. If you’re making colored candles, then this might not be an issue for you.

    I needed 8 x 1kg bags of wax to make around 115 candles. Yes, 8 kilos of candle wax. My original order was for 3 kilos and even then I thought I had over ordered! I would suggest trying an online calculator to determine how much wax you’ll need for your project.

    Tip: Candle wicks – there are a few different options for candle wicks, and I’m glad I got it right the first time around in that I chose pre-waxed with sustainers (ie, the little metal base that holds the wick in place). Some wicks aren’t pre-waxed and don’t come with a base… don’t even think about using those for this project unless you like hours of frustration trying to get them to do what you want.

    Tip: Time savers – Making a lot of these? I worked in batches of about 20 because I had so many candles to make, so use your judgement if you need to do the same. This gave me enough time to properly adjust each candle wick, to correct any wax issues, and to set aside to dry. For around 115 candles, we spent about 4-5 evenings making them (going at a leisurely pace).

  • Creamy chicken & broccoli pasta

    Creamy chicken & broccoli pasta

    Creamy chicken & broccoli | seefoodplay.com

    Happy Friday, y’all!

    It’s been a long week and if you’re like us, then you’re probably looking forward to finally relaxing, and not to making a big elaborate meal. Unless big elaborate meals every day of the week are your thing, in which case, more power to you. That’s not me, though, and by the time Friday rolls around, I’m usually trying to think of which leftovers to reheat…!

    When I don’t want to go the leftover route, though, this is one of my go-to Friday night recipes. This dish is great if you’re in a hurry to get dinner on the table: it requires very little prep and comes together in about 30 minutes using simple ingredients. So you can feel like you’ve got it all together and handle Friday night dinner like a boss 🙂

    I should preface this recipe by confessing that I’m not realllly a big fan of cream-based sauces like alfredo or four-cheese anything — but I have come to terms with the fact that I can’t serve tomato-based sauces alllll the time. Someone once told me a story about a husband leaving his wife because she served him spaghetti bolognaise every night for dinner…

    In hindsight, I wonder if they just made that story up because I served them spaghetti bolognese every time they came over for dinner, and they were trying to send me a message…?  Anyway, the point is that whether you love creamy sauces, or if you’re like me and they’re not your favorite, you’ll probably still love this recipe. The creamy-ness isn’t overpowering, with just the right amount of cream and the right amount of tang.

    Creamy chicken & broccoli | seefoodplay.com

    Creamy chicken & broccoli | seefoodplay.com

    Creamy chicken & broccoli | seefoodplay.com

    Creamy chicken & broccoli | seefoodplay.com

    Ingredients:

    • 250 grams of rotini
    • 2 tablespoons butter
    • 1 clove of garlic (minced)
    • 2 tablespoons flour
    • ½ cup greek yogurt*
    • ½ cup heavy cream*
    • 1 medium-sized chicken breast (cooked and cut into 2-inch cubes)
    • 1 ½ cups of chicken stock
    • 2 cups broccoli (cooked)**
    • 1 tablespoon parmesan cheese
    • Salt and pepper (to taste)

    Instructions:

    1. In a non-stick saucepan big enough to hold all of the ingredients, melt down the butter, then add in the minced garlic, salt & pepper, and flour whisking until smooth.
    2. Cook the flour & butter mixture for around 5 minutes, just to get rid of that raw flour taste, then slowly whisk in the chicken stock.
    3. Meanwhile, cook your pasta for 2 minutes less than the time indicated on the package (unless you like it softer than al dente, in which case cook per your pasta’s instructions).
    4. Whisk in the greek yogurt and heavy cream, and continue to cook until it has reduced to a smooth uniform mixture.
    5. Next, mix in the cooked & drained pasta, and the chicken and broccoli, stirring until evenly combined.
    6. If the sauce is too thick, then just add in a bit of water to thin it up a bit.
    7. Season with a sprinkle of salt & some fresh ground black pepper
    8. Serve hot with some crumbles of parmesan cheese on top!

    Servings: 2 if served as a main dish, 4 if served as a side dish.

    *If you want to make this recipe lighter, then you can use 1 cup of greek yogurt instead of the greek yogurt/heavy cream combination in the recipe. I prefer with cream though, because too much yogurt overpowers the dish a bit it and it comes out a bit too tangy for me. Though if you’re all about tangy chicken pasta, then go for it!

    **I roasted my broccoli in the oven for about 10 minutes. Though sometimes I blanch it for this recipe: boiled for 30 seconds, then drained.

    ***This dish can be vegetarian-friendly by swapping out the chicken stock for veggie stock, and simply not adding the chicken.

  • Avocado & soft-boiled egg toasts

    Avocado & soft-boiled egg toasts

    Avocado & soft-boiled egg toasts | seefoodplay.com

    In my quest to eat bigger breakfasts that are not pasta, I’ve stumbled upon the best thing ever: avocado for breakfast. Even after ten years of living in Paris, I never really got into the whole croissant with jam or pain au chocolat in the morning. Sweets just aren’t my thing — ever, really, but especially not in the morning. I’ve been surviving on big bowls of pasta to get me through the morning until lunch time, sometimes followed by…more pasta in the afternoon…then sometimes more pasta for dinner. I think you get the point: I eat way too much pasta!

    I don’t usually have time for much in the mornings, and have been desperately trying to find a few morning recipes that work for me: easy, fast, and filling.

    So I’m alllll about avocado toasts these days, because the combinations are endless, they still feel like breakfast and come together in under ten minutes. Here’s the latest addition to my avocado toast arsenal – enjoy 🙂

    Avocado & soft-boiled egg toasts | seefoodplay.com

    Avocado & soft-boiled egg toasts | seefoodplay.com

    Avocado & soft-boiled egg toasts | seefoodplay.com

    Ingredients:

    • ½ of an avocado
    • 1 tablespoon of heavy cream (or greek yogurt to cut out a few calories)
    • 1 soft-boiled egg*
    • 1 big slice of bread, toasted**
    • Salt & pepper to taste
    • Chives (optional)

    Servings: this makes breakfast for 1, but can easily be doubled/tripled for more 🙂

    Instructions:

    1. Combine the avocado and cream in a small bowl until smooth (or keep it chunky – that’s good too!)
    2. Spread your avocado and cream mixture evenly on the toast – don’t forget to go all the way to the edge.
    3. Place your soft-boiled egg on top, then season with salt and pepper to taste.
    4. Serve with a few cherry tomatoes and top with some chives.

    *You guys, this Cook’s Illustrated-inspired technique for perfect soft-boiled eggs is the bomb. Really. If you love soft-boiled eggs, but don’t love struggling to get them perfectly cooked with a beautiful golden runny yolk, then look no further: http://www.macheesmo.com/soft-boiled-eggs-a-giveaway/

    **I toast my bread in our oven (the same one that exploded) and spray on a bit of olive oil cooking spray: comes out soooo good. Here’s the spray I use, if you want to get an idea:
    Fry Light extra virgin olive oil spray

    ***If you still haven’t made these avocado egg toasts, then please stop reading and eat these now — so good!

  • Baked potato chips

    Baked potato chips

    Oven fried potato chips | seefoodplay.com

    What a weird couple of weeks I’ve been having: first my motorbike was stolen (twice…), then I cut my finger pretty badly (on my new food processor, literally after about 2 minutes of taking it out of the box), and now our oven exploded last night. That’s right – the glass door totally exploded and shot glass all over the place! I heard the loudest noise ever coming from the kitchen, so I raced out there only to find that the oven I had been preheating to make our Sunday roast chicken looked like a scene from an action movie. Jonathan wasn’t hurt thankfully, but it was pretty scary. We’ve been having some pretty questionable luck lately, so maybe now’s a good time to play the lottery, just in case my luck turns…!

    So until the flat management company sorts us out with a new oven, my recipes will be 100% stovetop (or crockpot). However, I was lucky enough to have finished this lovely snack-food recipe earlier in the day (ie, prior to my kitchen turning into the set from Die Hard with a Vengeance). As I do sometimes on Sunday afternoons, I got a little over-zealous in my potato peeling for our mashed potatoes that I was prepping for dinner, and had a few extras than I needed for the mash.

    Then the light bulb went off: I’ve been meaning to work on a few healthy snack recipes that are not sweet for me and J, and I’ve had this baked chip idea in the back of my mind for weeks. Now, I’ve tried baked potato chips before and they’ve all been gross (sorry, but it’s true!). For some reason, though, I got it in my head that I could do better than those cardboard pieces of I-don’t-even-know-what I was paying a fortune for (why do healthy snacks always cost so much more, and taste so much worse…?).

    So out came my handy mandoline (these things are seriously amazing!) and I sliced up a potato in about 20 seconds and popped the slices in the oven – ready in about 5 minutes! These are surprisingly easy and taste like better than their fatty pre-bagged cousins that you find in your grocery store’s snack aisle.

    Oven fried potato chips | seefoodplay.com

    Oven fried potato chips | seefoodplay.com

    Oven fried potato chips | seefoodplay.com

    Ingredients:

    • 1 tablespoon olive oil
    • 1 potato
    • 1 teaspoon sea salt

    Instructions:

    1. Preheat your oven to around 400 °F / 200 °C
    2. While your oven is pre-heating, wash and thinly slice (and peel if you prefer) a medium-sized potato, then rinse the slices under cold water in a colander until the water runs clear to get rid of that starchy residue.
    3. Coat a large baking sheet with olive oil (or non-stick cooking spray), then evenly spread out your potato slices. I have a tiny baking sheet, so I do mine in batches.
    4. Cook for around 5 minutes or until golden brown. Don’t walk away from the kitchen while making these because they go from whoa-totally-amazing to horribly-nasty-scorched in the blink of an eye. I should take my own advice, though, because I always burn the first batch…
    5. Sprinkle them with the sea salt, throw them in a bowl and enjoy!

    Servings: It’s roughly one potato per person, so adapt as you see fit!

  • Chilli con carne

    Chilli con carne

    Chilli con carne | seefoodplay.com

    I know, I know…it’s May and I’m writing about making hearty, spicy chilli! With 50 degree weather these past few days, though, I’ve been struggling with salads and other typically-Springy dishes. Now, I’m in full-blown Autumn mode and have been craving thick and filling soups and stews. A good compromise considering it is May, is Chilli! It’s really a year-round dish, and can easily be freshened up with a big dollop of sour cream, some fresh cilantro, served atop a big bowl of rice. Or if you are always cold like me, then you can just have a big steaming bowl of the stuff on the couch enjoying a marathon of Netflix with your hubby. Or you can eat spoonfulls of it directly out of the pot and hope said hubby doesn’t catch you… up to you 😉

    Adding this recipe to the blog was a no-brainer because I’ve been making it for years, and everyone needs at least one good go-to chilli recipe. This is mine because it uses mainly pantry items, so can almost always be thrown together if you’re in a pinch trying to find out what to make for dinner. This is essentially a perfect weeknight dinner because it packs a lot of flavour with only a few ingredients. It’s also great because it allows you to be flexible with the time you put dinner on the table, because it can be ready in 30 minutes, but can simmer for an extra hour if needed! Anyway, this is one of those recipes that I’ve made at least a hundred times (like my marinara sauce) and I love it just as much each time. It’s also one of those recipes that is extremely forgiving… you barely even need to measure things out too well.

    Chilli con carne | seefoodplay.com

    Chilli con carne | seefoodplay.com

    Chilli con carne | seefoodplay.com

    Ingredients:

    Spices

    • 1 tablespoon of powdered garlic
    • 1 tablespoon of oregano
    • 2 tablespoons of cumin
    • Smoked paprika (or chili powder)
    • Salt & Pepper to taste
    • 200 grams of ground beef*
    • 1 large white onion, chopped
    • 4 cloves of garlic, minced
    • 1 large can of whole tomatoes, passed through the mixer until smooth (unless you want chunks of tomatoes, which I love but Hubby doesn’t)
    • 1 16oz  big can of red kidney beans
    • 1 tablespoon of butter
    • A few spoonfuls of Olive Oil

    Garnish: fresh chopped cilantro, sour cream, chives, chopped onion… and whatever else you like!

    Instructions:

    1. Add a spoonful of olive oil, all of the spices, and ground beef to a large saucepan or non-stick pot, then brown the ground beef on medium heat (about 5-10 minutes).
    2. Add in your chopped onion, and cook for about 5 minutes more.
    3. Turn up the heat for about a minute (take care not to burn the onions, though!) then add in the tomato purée. The tomatoes should de-glaze the pan, so once that happens, turn the heat back down to medium.
    4. Finally, add in the beans and let simmer for about 20-30 minutes. If you have a bit of time, don’t hesitate to let this simmer for an hour or so; it only gets better with time!
    5. Top with freshly chopped cilantro, a dollop of sour cream, and a drizzle of olive oil.

    Notes: I use a very small amount of ground beef in my chilli because I really feel that the beans and tomatoes are the stars of this dish, but feel free to beef this up a bit more (ha ha see what I did there? Okay nerd moment out of my system). Seriously though, sometimes I add less sometimes more. Play around with it until you get a beef-to-bean ratio that best suits your taste buds!

  • Stuffed portobello mushrooms

    Stuffed portobello mushrooms

    Stuffed portobello mushrooms | seefoodplay.com

    In my quest to get the Mister to eat more veggies, I may have stumbled upon the most unlikely of dishes for Meatless Monday* that he will actually eat! So, some of my favorite things to cook with are mushrooms, tomatoes, mozzarella cheese…Italiany-type ingredients, basically. I would swap out mushrooms for meat any day, but Jonathan… not so much. In fact, there are only a few things he doesn’t eat, but they just so happen to be… mushrooms and tomatoes.

    As you know, we’ve recently moved to London and one of the best parts, you might be wondering? Grocery shopping. Sure… London has all sorts of amazing tourism, incredible museums, a Royal Family… but I’m all about the grocery stores! That’s not to say that Paris doesn’t have amazingly fresh produce and all sorts of fancy ingredients, but some things are just impossible to find. Like portobello mushrooms. These things are amazing: baked, sautéed, grilled… absolute perfection. So the other day I ordered a few with my weekly shop because they sell them here (hallelujah!), thinking I’d have them all to myself (cue evil laugh).

    So I made our regular dinner, but made a starter for myself of these bad boys. Stuffed with Italian chicken sausage and cherry tomatoes, topped with mozzarella cheese and fresh basil and a drizzle of olive oil. In the oven for 15 minutes they went, and the cheesy and bubbly masterpiece that came out…well, there are no words. As I began to dig in to my mushroomy feast, I looked up to see Jonathan curiously eyeing the plate.

    Of course I jumped at the occasion and cut him off a little piece, perfectly balanced with a little bit of tomato juice, gooey and crispy mozzarella, and a few little crumbles of the sausage. As he tasted it, then tasted some more… I couldn’t contain myself when he gave his head-nod of approval!

    Long story short, these are amazing and if my tomato-hating mushroom-disliking husband approves, then just imagine how good they must be 😉

    Stuffed portobello mushrooms | seefoodplay.com

    Stuffed portobello mushrooms | seefoodplay.com


    Ingredients:

    • 4 portobello mushrooms
    • Italian sausage (I used chicken sausage), cooked and crumbled
    • Cherry tomatoes, halved
    • Fresh basil
    • Mozzarella cheese
    • Olive oil

    Instructions:

    1. Wash your mushrooms to make sure you get any dirt off, then pat them dry.
    2. Arrange them in a baking dish, then remove the stems (I just throw the stems into the dish, so they’ll bake too)
    3. Layer in the toppings: crumbled sausage, cherry tomatoes, mozzarella cheese
    4. Drizzle a bit of olive oil on top, then bake for 15-20 minutes, depending on your oven.

    *These would be perfect to add to your Meatless Monday rotation – just take out the sausage!